How to Turn Your Shed Into a Fun 'Treehouse' PlatformM
M
In 10 Cool Hand Drawn Steps
Updated: 30 Mar 2026


Desperate to build a treehouse, but you DON’T have any trees? Well, there is a way… if you have a garden shed.
Yes, that’s right… your unloved, cobwebby, full of garden tools shed, can easily be transformed into an exciting treehouse style adventure… come for a play…


Step by Step Guide
The following instructions are not detailed blueprints, but they are full of ideas that will help you build your own ‘treeless’ treehouse…

Step 1: Refer to the exploded view at the top for reference, essentially the concept is simple… one platform attached to the shed roof, the other platform joined to it at right angles and supported by legs.
Each platform is a timber frame covered by planks or sheet timber… I used tongue and groove planks, but marine plywood would be better.
If you want saftety walls you’ll need to add vertical posts, where possible just extend the support legs above the platform.

Step 2: Pre-prepare some wooden slats from flat timber (A), around (T)21mm x (W)46mm x (L)450mm (I used two between each post).
Drill 2 holes (large enough to fit the rope) 35cm apart in each post. Do the same for the wooden slats.
Tie a knot at the end of the nylon rope and feed it through the top hole of the first post (B)… then through 2 wooden slats… the next post… more slats… and so on, until the rope has been fed through the last post (C).
Pull the rope as taught as you can, and feed it back through the remaining hole in each post and slat. With the rope poking out of the first post (D), tie a knot about 7cms from the hole.
Make a wooden clamp, a block of wood with a notch (E), and with the rope pulled super taught, screw the clamp above the knot (F).

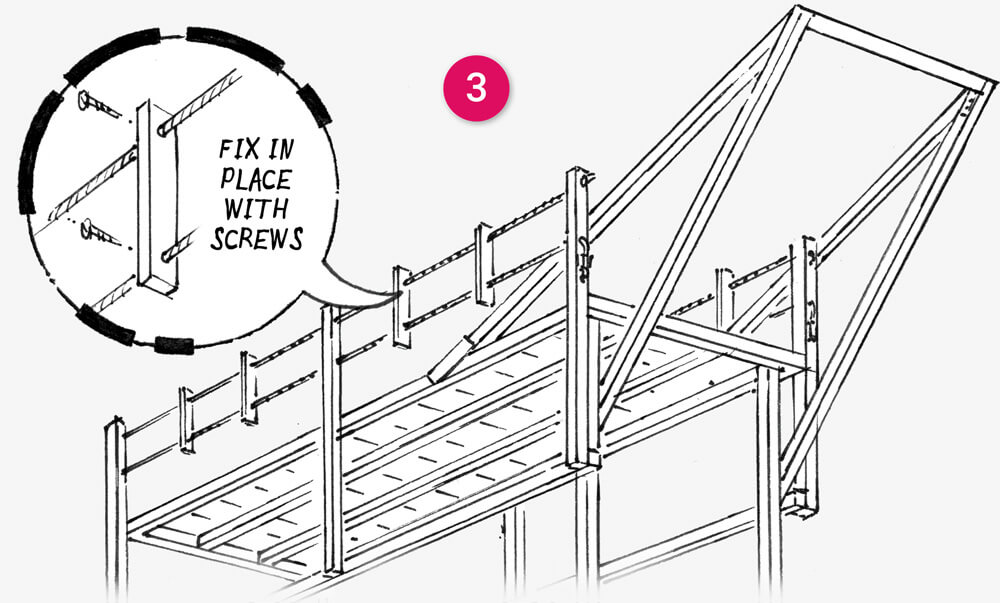
Step 3: Finally, space the slats evenly and fix them in position with screws.

Step 4: For a more rigid railing connect the top of the posts with a horizontal length of timber and attach vertical slats at regular intervals.

Step 5: To create a challenging rope climb, create a triangular timber overhang.
Be sure to strengthen it with jointing plates and corner brace brackets (you don’t want this to break!).

Step 6: Accesorize your climbing frame with a ‘friction grip’ crane that uses a simple notch to grip the rope. Please note, you will need to buy one small pulley and two door hinges from your local hardware store. Just follow the illustration.

Step 7: Cut a square hole in the roof felt. Add a diagonal cut to each corner and fold back the felt (A). Use a pencil and ruler to mark out a square. Drill a hole in each corner and use a jig-saw to cut out the square (B).

Step 8: Make a wooden frame (slightly bigger than the hole) using the same wood you used to make the slats for the railing. Screw it onto the roof. Let the felt flaps overlap the edges of the frame and seal with roofing bitumen (C).
Make another frame big enough to fit over the first. Cover it with wood and seal it with felt and bitumen (D). Attach it to the first frame using hinges.

Step 9: Make a simple ladder and attach it to the inside of the shed, directly under the trapdoor, you won’t be able to climb up onto the platform without it!
Step 10: Secure the support legs in the ground using spikes made from straightened angle bracket. This will stop them slipping or moving.
Materials List
- Planking or marine plywood
- 47mm x 50mm x 2.4m timber
- 21mm x 46mm x 2.4m timber
- Nylon rope
- One Pulley and hinges
- Roof bitumen
- Large and small screws
- Hammer, screwdriver, saw, drill
Give It Your Own Twist
It’s unlikely you’ll have the same shed or garden space as me, so get creative, and have fun coming up with your own roof top treeless treehouse!