How to Make a Telescopic Light From LED Tree LightsM
M
In 21 Cool Hand Drawn Steps
Updated: 30 Mar 2026


Inject year-long sparkle into your life by turning old Christmas tree lights into funky telescopic floor lights.
Not only do they look great, but they also come with a unique feature… a counterbalance mechanism that allows the height of the light to be adjusted.
See it in action
Check out the funky lighting effects…
Step by Step Guide
If you are up for a challenge, make your own telescopic paper floor light by following the detailed instructions below.
I’ve also included ideas for simplifying this project underneath.

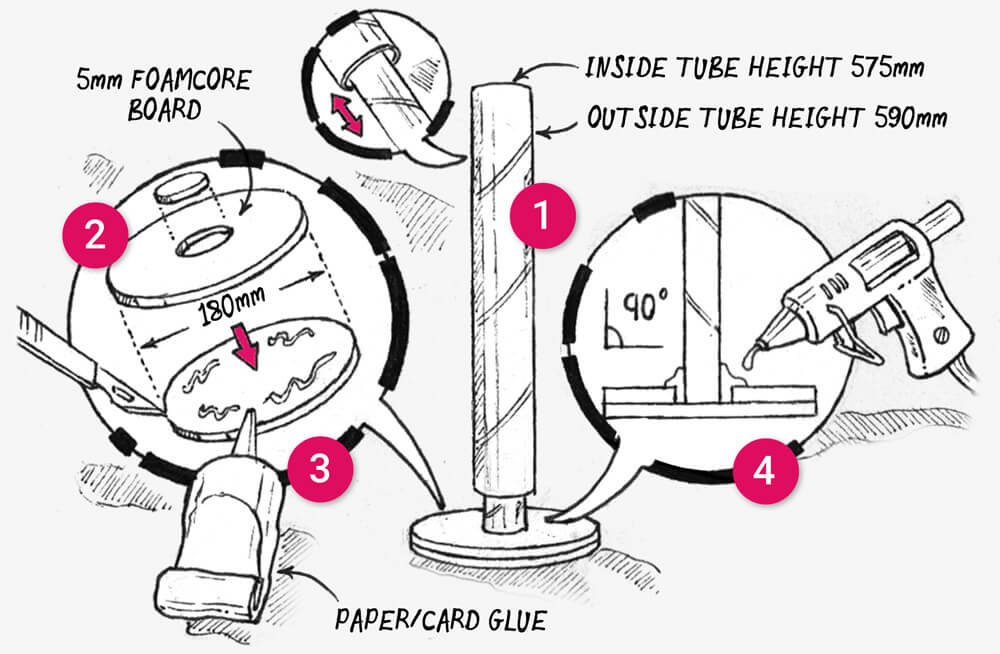
Step 1: Find two old ‘wrapping paper’ tubes with different diameters - one needs to fit inside the other. Cut them to the lengths shown.
Step 2: Cut two discs of foamcore board 180mm in diameter. Cut a hole in the centre of one disc 5mm wider than the inner tube.
Step 3: Glue the two discs together.
Step 4: Place the inner tube in the centre of the hole in the top disc. Fill the gap with hot glue, ensuring the tube is vertical, use a spirit level if you have one.

Step 5: If the big gap between the inner tube and the outer tube is too big, glue strips of card around the top of the inner tube until it fits snugly.

Step 6: Glue (or tape) a stack of coins together to create a counterweight.
Step 7: Create a hook from a paperclip and hot glue it onto one end.
Step 8: Tie 70cms of sewing cotton (use 4 strands) onto the hook.

Step 9: Lower the weight into the inner tube.
Step 10: Make a ‘handle’ and ‘guide wire’ from 1.5mm wire and attach them to the outer and inner tubes using hot glue. Use the illustration above for detailed visual reference.
Step 11: With the weight pulled to the top, and the thread running over the guide wire and down the outside of the inner tube, lower the outer tube until it rests on top of the base.
Step 12: Use hot glue to attach the thread to the outside bottom edge of the outer tube.
N.B. Be careful not to rotate the tubes otherwise the cotton will snap.

Step 13: Wrap the LED lights around the outer tube, starting at the top and working your way down. Use hot glue to hold them in place.
Step 14: Loosely wrap the remaining lights and wire around the base of the outer tube, but don’t glue, otherwise the outer tube will not be able to move upwards.
Step 15: Glue the sequence control box (if there is one) and the end of the wire onto the base using more hot glue.
Step 16: Cut a notch into the base so the mains wire has space to exit.
Step 17: Finally, go back and adjust each LED light so it points outwards.

Step 18: Cut a sheet of A2 (150gsm) card into a piece 590mm x 575mm. Crumple it, and then smooth it out. Wrap it around the base and glue into position.
Step 19: For additional support, bend some wire into a ring and glue it onto the inside edge of the card.

Step 20: Cut a Foamcore disc 250mm in diameter. Cut a hole in the centre slightly wider than the outer tube. Crumple and smooth more card, this time 590mm x 654mm, and wrap and glue it around the disc.
Step 21: Glue a small circular Foamcore disc, with a slit for the handle, over the central hole.
Step 22: This shows you how the outer shade rests (not glued!) on top of the outer tube, with the handle protruding through the slit.
Step 23: To finish off, hot glue a wire ring onto the inside edge of the card…
Step 24: …and four feet made from more bent wire onto the base.
Materials List
- A2 sheet of card
- Foamcore board for the base
- 2 cardboard tubes
- Coins
- 1.5mm wire
- String of LED lights
- Paper glue
- Scissors and a craft knife
How to simplify the design
If creating a telescopic counterbalance is too much hassle, make a fixed height floor light… it’s easier, and will still look great! Here’s how:
Glue a cardboard tube to a circular base, see Step 4… wrap the LED lights around it, Step 13… make a paper shade (a tube with a top) to sit over it, Step 18.
Creative Takeaway
LED string lights are extremely versatile and perfect for repurposing into new exciting forms of lighting… try coming up with your own cool ideas!