How to Make a Steampunk Robot That Defies GravityM
M
In 19 Cool Hand Drawn Steps
Updated: 30 Mar 2026


This Steampunk inspired balancing robot uses nothing more than a wire counter weight to defy gravity.
It’s a really great way to teach your kids about centre of gravity and balance.
Special Features
It also has some cool features… such as a see-through head, and arms that rotate up and down and move the robot’s steel heart!

Step by Step Guide
If you’d like to make your own steampunk balancing robot, just follow the instructions below, good luck.
Let’s get stuck in…

Step 1: Take a toilet roll tube (tube A) and use a compass to draw two circles, slightly smaller than the diameter of the tube, on opposite sides.
Step 2: Use a craft knife to cut out the two circles.
Step 3: Draw a small rectangle between the two circles and also cut that out.
Step 4: Take the other tube (tube B) and cut along the length, squeeze it & slide it through the 2 holes in tube A. Mark the overlap with a pencil, and then cut it off - rejoin the tube by glueing a strip of card along the inside of the join.
Step 5: Shorten the tube so it protrudes from tube A by 15-20mm.

Step 6: Use a hacksaw to cut the top off an empty plastic ‘roll on’ deodorant/anti-perspirant bottle.
Step 7: Spray the top you just cut off, the two tubes (A & B), and an A4 sheet of thick card (210gsm) with metallic silver paint.

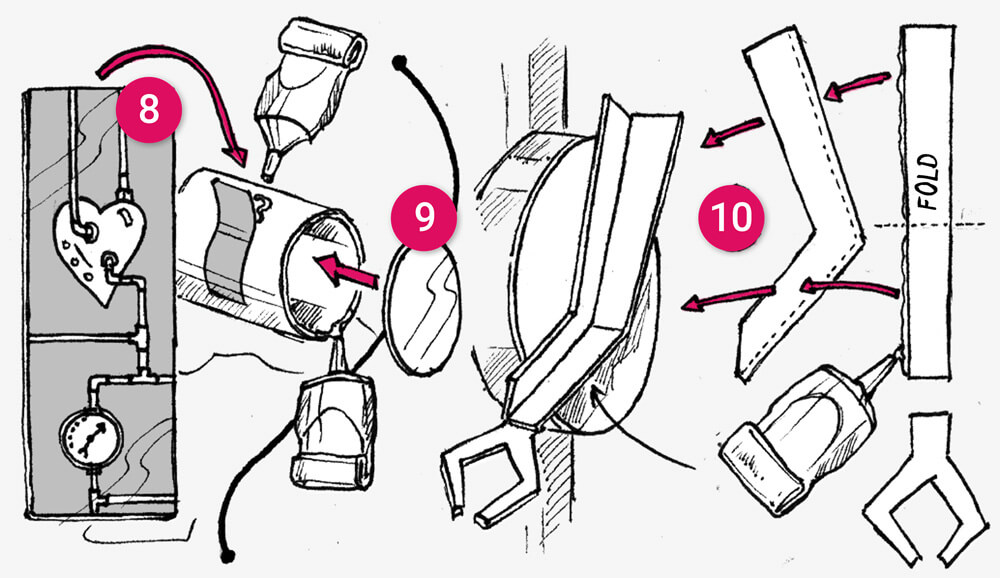
Step 8: Cut a rectangle of paper, a bit wider than the rectangular hole in tube A, and twice the length. Spray it silver. Draw pipes on one half and a steel heart on the other half, using a permanent marker. Glue it on to the middle of tube B.
Step 9: Cut two discs from the silver card & glue them onto each end of tube B.
Step 10: Take more silver card and construct the arms following the diagram above and glue them onto the two discs.

Step 11: Spray some more card with bronze metallic spray.
Step 12: Cut thin strips from the bronze card and draw ‘rivots’ along its length using the permanent marker. Glue the strips around the ends of tube B and the bottom of tube A.
Step 13: Fashion a jaw and mouth from two more strips of bronze card and glue them onto the top of tube A, just above the ‘shoulders’.
Step 14: Use both silver & bronze card to create the cogs for the ‘brain’ and glue them into the inside of a clear platic lid, I got mine from a can of shaving gel.
Step 15: Make the robot’s eyes from small rectangles of silver and bronze card, use the diagram above as a guide. Glue the eyes onto the front of the lid.

Step 16: Use hot glue to attach the clear plastic lid onto the top of tube A, and make sure the eyes are facing forward (the side with the rectangular hole).
Step 17: Shape 450mm of 1.5mm thick wire into a curve. Bend both ends with pliers, and hot glue one end onto an AA battery.
Step 18: Cut a hole into the bottom of tube A, on the backside, about a quater of the way. Push the wire through and secure it in place using lots of hot glue!
Step 19: Finally, use more hot glue to attach the roller-ball base. That’s it!
Materials List
- 2 cardboard toilet roll tubes
- Cards (210gsm)
- 1.5mm galvanised wire
- Old AA battery
- Craft knife or scalpel and scissors
- Hot glue gun
- Black permanent marker
- Clear plastic lid (from a can of shaving gel)
- Empty plastic roll-on deodorant bottle
- Metallic silver and bronze spray paint
- Compass, hacksaw, pliers and wire cutters
Creative Takeaway
The Steampunk style is very forgiving, you can cobble anything together… as long as you add a few cogs and rivots, and spray it with metallic paint!