How to Make a Snowman Napkin Holder from Starbuck’s CupsM
M
In 21 Cool Hand Drawn Steps
Updated: 30 Mar 2026


Next time you buy a Grande Latte from Starbucks, hang onto your paper cups. With a little ingenuity you can upcycle them into this cool Snowman napkin holder.
What’s more, it uses no other material, which was the challenge I originally set myself… “What could I make using ONLY paper cups?”.
Step by Step Guide
If you want to make your own paper cup snowman napkin holder, here’s some easy to follow instructions…

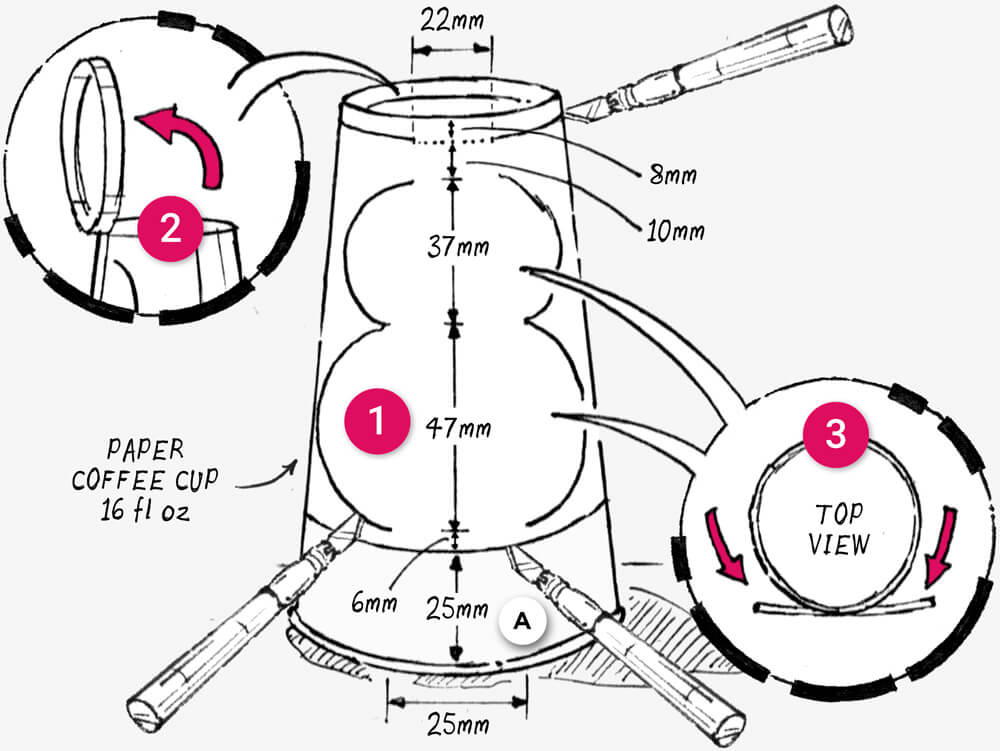
Step 1: Turn a 16fl oz paper cup (Starbuck’s Grande size) upside down and draw a line around it 8mm from the top and another 25mm from the bottom. Mark a 22mm section along the top line, this is a fold.
Draw the body of the snowman (4 curves) centred under the fold and between the two lines, leaving a 10mm gap at the top and a 6mm gap at the bottom. Use the illustration as reference.
Cut along the lines using a craft knife but don’t cut the fold! Also, make sure you keep the bottom offcut (A).
Step 2: Fold the top of the cup upwards to form the head.
Step 3: Fold both sides of the snowman’s body outwards.

Step 4: Cut a 10mm strip from around the top of offcut (A).
Step 5: Wrap and glue the strip around the ‘neck’ of the snowman to create the first part of the scarf.
Step 6: On the bottom of offcut (A), adjacent to the rim, draw two ‘half’ hand shapes. Cut along the rim and around the hands.
Step 7: Unroll the rim to create the other half of each hand and trim it into a curve.
Step 8: Use a craft knife and sharp pencil to make a small hole in each side of the snowman. Trim each arm to a length of 52mm and insert one into each hole.

Step 9: Grab the second paper cup. Cut two 10mm wide strips from around the base, these will form the front of the scarf.
Step 10: Snip the end of each strip with scissors to create ‘tassles’.
Step 11: Bend the strips to create a ‘wavy’ scarf effect and glue them onto the front of the neck.
Step 12: Now for the hat. First, cut out a rectangular section 30mm x 110mm from the spare cup.
Step 13: Next, cut a circle 35mm in diameter.
Step 14: And another circle 58mm in diameter.
Step 15: Roll the rectangle into a tube, with a 10mm overlap, and secure with glue.
Step 16: Glue each circle onto opposite ends of the tube.

Step 17: To complete the hat simply glue it onto the top of the head.
Step 18: Next, cut a slender ‘V’ shape into the centre of the face and fold it up to create the snowman’s nose.
Step 19: Glue a strip of card 15mm x 45mm behind the ‘neck’ to strengthen it and stop the head from flopping down.

Step 20: Mix some PVA glue with poster (or acrylic) paints and decorate your snowman.
Step 21: Use a black marker pen to add the eyes and mouth.
That’s it! Just add napkins and display on your Christmas table.
Materials List
- 2 x Starbucks Grande size paper cups
- Scissors and craft knife
- Pencil and ruler
- Poster/acrylic paints
- Paintbrush and mixing bowls 6 .Paper and card glue (e.g. UHU in the UK)
- PVA glue (for mixing with paint)
- Black marker pens
- Napkins!
Creative Takeaway
Seeing what you can make from just one material is a fun creative challenge. It’s also a great opportunity to repurpose something that would end up in the bin!