How to Make a 'Snail Soup Decoy' Treasure Stash for KidsM
M
In 6 Cool Hand Drawn Steps
Updated: 30 Mar 2026


Outfox burglars and nosy siblings with a Snail Soup decoy, the ultimate secret stash box for kids!
Yes, disguised as a yukky can of snail soup, this clever decoy will repel ALL unwanted attention. Perfect for stashing pocket money, sweets, trading cards and much more!
Step by Step Guide
To make your own Snail Soup decoy, keep reading. I’d suggest downloading my printable artwork first, it will help a lot, just subscribe below…
OK, time to cencentrate, let’s kick things off…

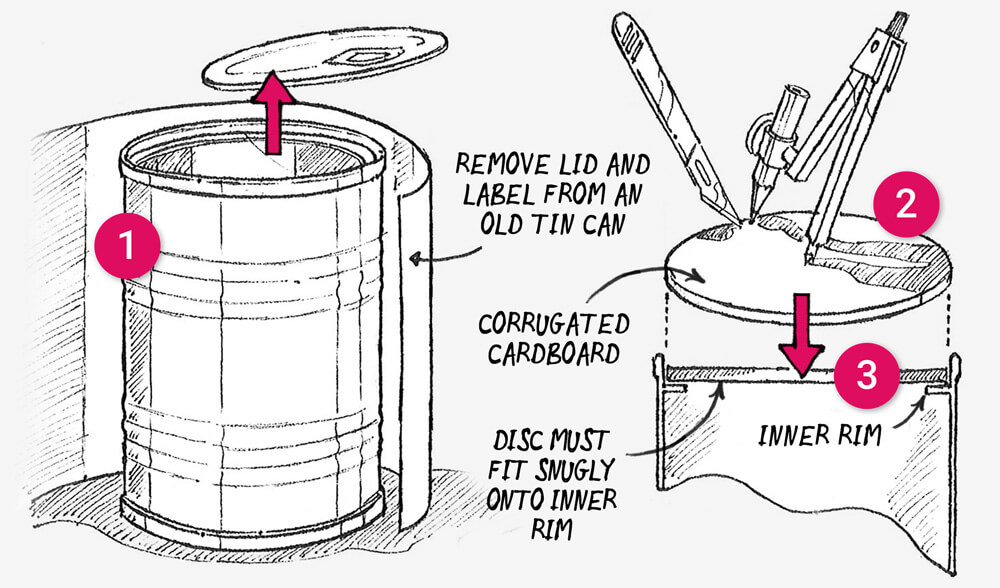
Step 1: Remove the lid and label from an old tin can.
Step 2: Use a compass to draw a circle (the size of the inner diameter of the tin can) onto corrugated cardboard.
Step 3: Cut out the circle and ensure it fits snugly onto the inner rim of the can.

Step 4: Saw a metal spoon in half.
Step 5: Cut a small slot into the cardboard circle, the size of the sawn end of the spoon and 6mm from the edge - the spoon must fit without gaps.
Step 6: Now make ‘snail soup’ by mixing PVA glue with green and yellow poster paint or acrylic paint.

Step 7: Place the tin can next to a wall, insert the cardboard disk and push the bottom of the spoon into the slot, leaning it against the wall for support.
Step 8: Place a few lumps of plasticine (substitute pieces of snail!) onto the cardboard disc.
Step 9: Pour on the glue until it reaches the top of the rim.
Step 10: Leave it to dry for 2-3 days. Then paint the surface with a thin layer of PVA glue for a nice gloss finish.

Step 11: Measure inside of the can and workout the diameter and height required for the ‘safe’ to fit loosely inside. Using these sizes cut 2 discs from corrugated cardboard and make one a hollow ring. Glue and wrap thin card around the discs to create a cylinder.
Step 12: Use tape to hold the card while the glue dries.
Step 13: Print and cut out the ‘safe’ artwork and spray mount or glue it around the cylinder.

Step 14: Use a craft knife to cut around the door, leaving the hinged side attached. Also cut out a semi-circular finger hole (A) on the right side of the door.
Step 15: To prevent creasing remove a tiny strip of artwork from along the hinge.
Step 16: Open the door and score along the inside of the hinge for easy opening.
Step 17: Cut and glue card tabs onto the inside of the door and door frames, this helps lock the door (B) and prevent it from opening inwards (C).
Step 18: Finally, remove the snail soup ‘lid’ and glue it onto the top ring of the cylinder.
You’re now ready to stash your valuables!
Just fill the safe, close the door, and lower it back into the tin can, until the snail soup ‘lid’ rests on the inner rim.
Materials List
- One empty tin can
- Corrugated cardboard
- Paper glue for sticking card
- PVA glue for mixing with paint
- Poster paints & paint brush
- Card (210gsm)
- Craft knife
- Pencil and compass
- Metal (or plastic) spoon
- Plasticine
Creative Takeaway
Even a craft staple, such as a ‘treaure box’, can be given a new twist… so let your imagination run wild.