How to Make Your Kids a Dimmer Switch Story DialM
M
In 11 Cool Hand Drawn Steps
Updated: 30 Mar 2026


Mesmerise your kids by turning their bedroom dimmer switch into a fun interactive story.
With the lights on, a cardboard dial displays a picturesque daytime scene… as the lights are dimmed, the sun in the picture begins to set, until the picture reveals a night sky with moon and stars!
Step by Step Guide
If you’d like to make your own ‘dimmer dial’ follow the instructions below. First, let’s take a look at the approach as a whole…

It’s simple, really… just a circular dial and a cover all made from cardboard.

Step 1: Cut two discs from corrugated cardboard, one 94mm and the other 98mm in diameter. In the centre of the smaller disc (Disc 2) cut out a hole, it must be small enough to fit tightly over the dimmer switch knob.
Step 2: Take the other disc (Disc 1) and use a craft knife to cut out a large ‘pie shaped’ hole, use the measurements shown.
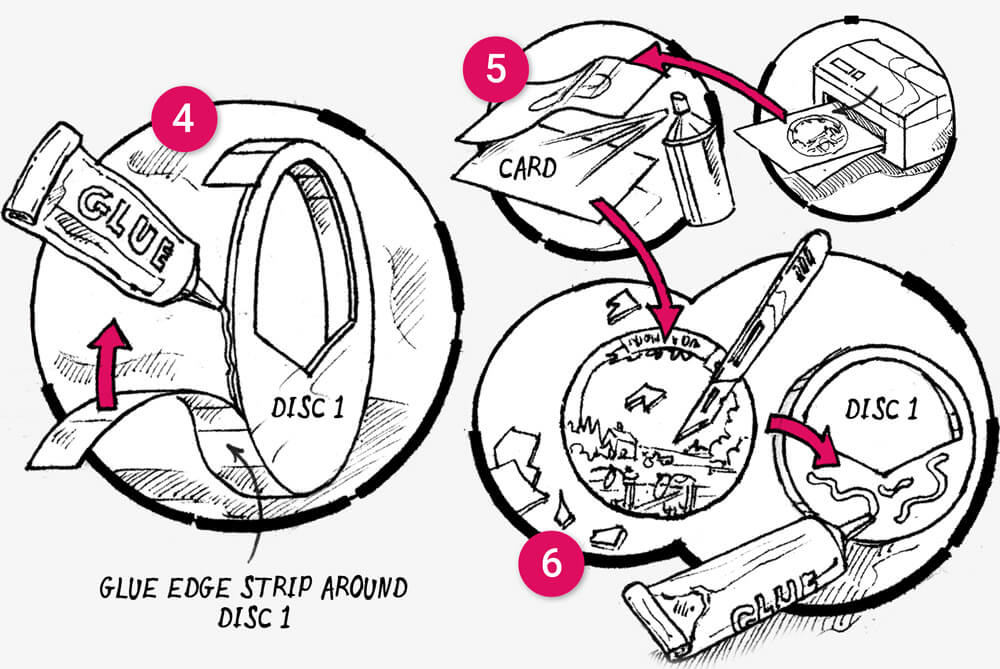
Step 3: Cut two strips 320mm x 27mm from thick card (210gsm) and join them end on end using glue - this is the side strip.

Step 4: Apply glue along the edge of Disc 1 and attach the side strip.
Step 5: Print the Disc 1 artwork onto card… ergh! Unfortunately, I’ve lost those files… so you’re going to have to get the colouring pens out! Place Disc 1 face down onto some white paper, or ideally light card stock, and trace around it with a pencil. Draw your scene on the card, use my illustration as reference.
Step 6: Trim around the artwork and glue it onto the front of Disc 1.

Step 7: Print out disc 2 artwork… ergh! No artwork sorry… instead, place disc 2 onto some white paper, or light card stock and trace around it. Draw a ‘night & day’ sky scene onto it, with the sun and moon on opposite ‘sides’, remember, the disc rotates, so becareful not to end up with an upside down sun or moon!
Step 8: Cut out your masterpiece (including the hole) and glue it onto disc 2.
Step 9: Cut out two ‘tabs’ from the thick card, fold them in half and glue them to the top and bottom of the cover.

Step 10: Turn the light on and push disc 2 onto the dimmer knob, sun at the top.
Step 11: Place the cover on top, attaching the two ‘tabs’ to the wall with tape or poster putty (Blu Tack).

That’s it, just dim the lights (12) and watch the moon appear (13).
Materials List
- Rotary dimmer switch!
- Thick and thin card
- Paper glue
- Craft knife and scissors
- Pencil, ruler and eraser
- Colouring pens or paints
Creative Takeaway
Objects that move, even the humble dimmer switch, can be hi-jacked in order to use the movement in other more creative ways. Is there something you do with… a door, window or the wheel on your bike?