How to Build a Tall Spaghetti and Marshmallow TowerM
M
In 14 Cool Hand-Drawn Steps
Updated: 30 Mar 2026


Master the art of building a record-breaking spaghetti and marshmallow tower. This science prize-winning design reaches a statuesque 189 cm (6ft 2in), making it the perfect project for school science days, STEM fairs, and professional team-building events.
And while it’s not ‘rocket’ science, it is science… structural engineering to be precise. Ignore basic physics at your peril, triangulation and load distribution are your friends.
And I’m not exaggerating, building a really tall spaghetti tower is trickier than you think, you’ll need a plan (keep reading)… and plenty of patience!
Materials List
- 1 pack of dry spaghetti
- 70+ standard marshmallows
- Measuring tape
- Egg (as a load test)
- Large tray or board
- Lots of patience!
Step-by-Step Instructions
Before we get started, if you’d like the teacher’s pack, which includes a printable certificate and PowerPoint instructions, please subscribe below.
Here we go, the how-to guide guaranteed to stop your tall tower from teetering!
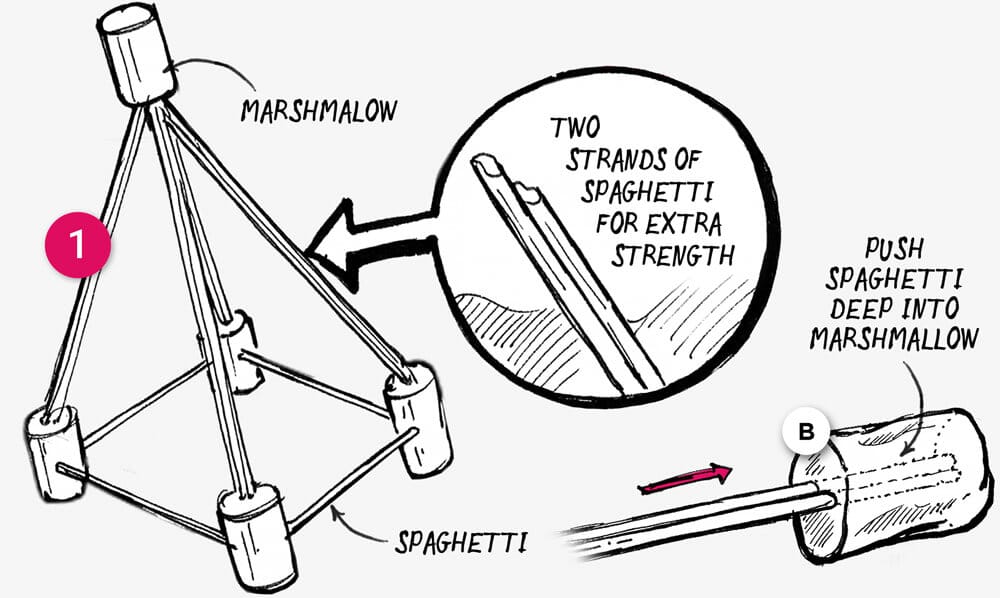
Step 1: Construct the Pyramid Foundation Units
Start by building two pyramids, with four marshmallows at the base, and one marshmallow at the top. Use 1/2 length strands of spaghetti to connect the base marshmallows and full length strands to connect the base marshmallows to the marshmallow at the top. Push the spaghetti deep into the marshmallow, it provides more grip (see fig. B).
Engineering Pro-tip
For the bottom two layers of the tower, double up the strands of spaghetti in the vertical connectors, it reduces slippage and adds support.
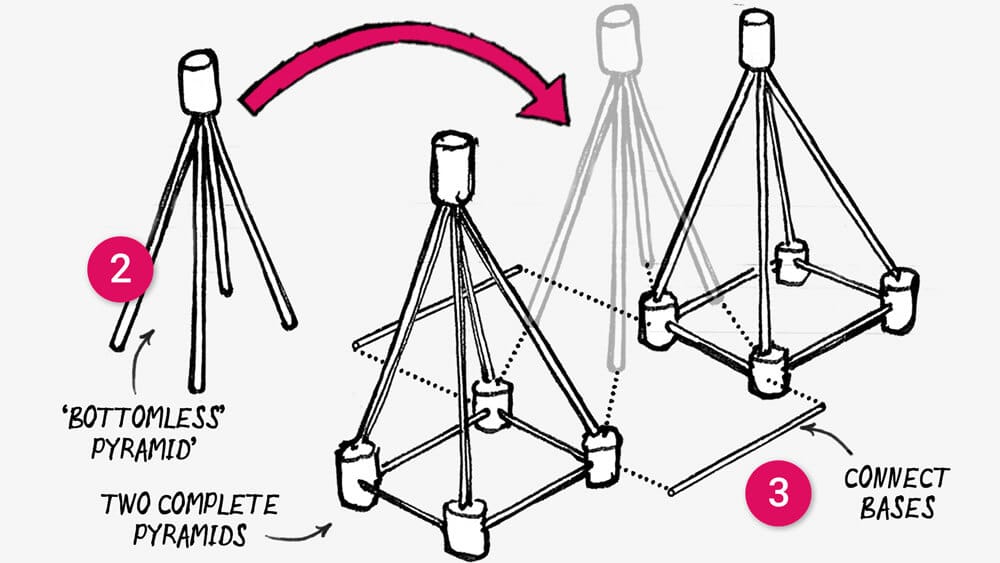
Step 2: Make a 'baseless' pyramid
Push four full-length spaghetti strands into a marshmallow to form a 'baseless' pyramid. This will be used to connect the two complete pyramids.
Step 3: Join three pyramids
Take the two completed pyramids and space them a pyramid distance apart. Push the four spaghetti stands of the 'baseless' pyramid into the marshmallows at the base of the completed pyramids. Use two 1/2 length strands of spaghetti to connect the base marshmallows.
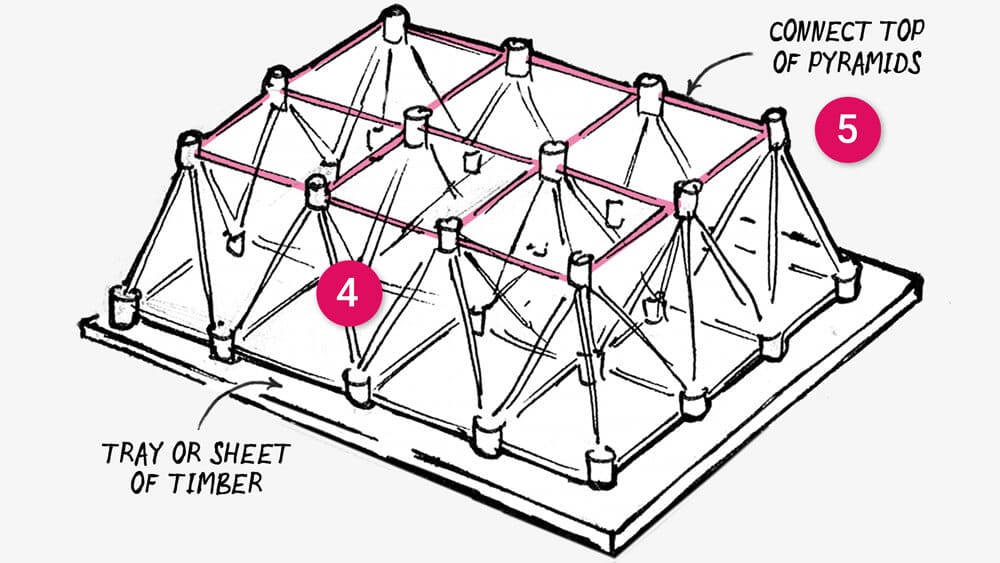
Step 4: Complete the Base Grid
Complete another row of three pyramids by repeating steps 1-3.
Place the two rows a pyramid distance apart and connect the two rows with three more baseless pyramids (remember to also connect the base marshmallows with 1/2 length spaghetti strands).
Add one last row of pyramids by connecting three more baseless pyramids, this time you'll only be able to join them on one side. On the other side you'll need to push the floating strands into four marshmallows, that you then inter-connect using more 1/2 length spaghetti strands.
Pro-tip
Build the base layer on a tray or piece of board, if you are likely to move or transport your tower after construction.
Step 5: Connect the tops
Connect the tops of the pyramids with perpendicular cross-braces (not diagonal cross-braces) using 1/2 lengths of spaghetti to complete the first layer.
Step 6: Assemble the Second Pyramid Layer
Using the techniques you have already learned. Build a second layer of pyramids on top of the first layer, this one will consist of two rows of three pyramids.
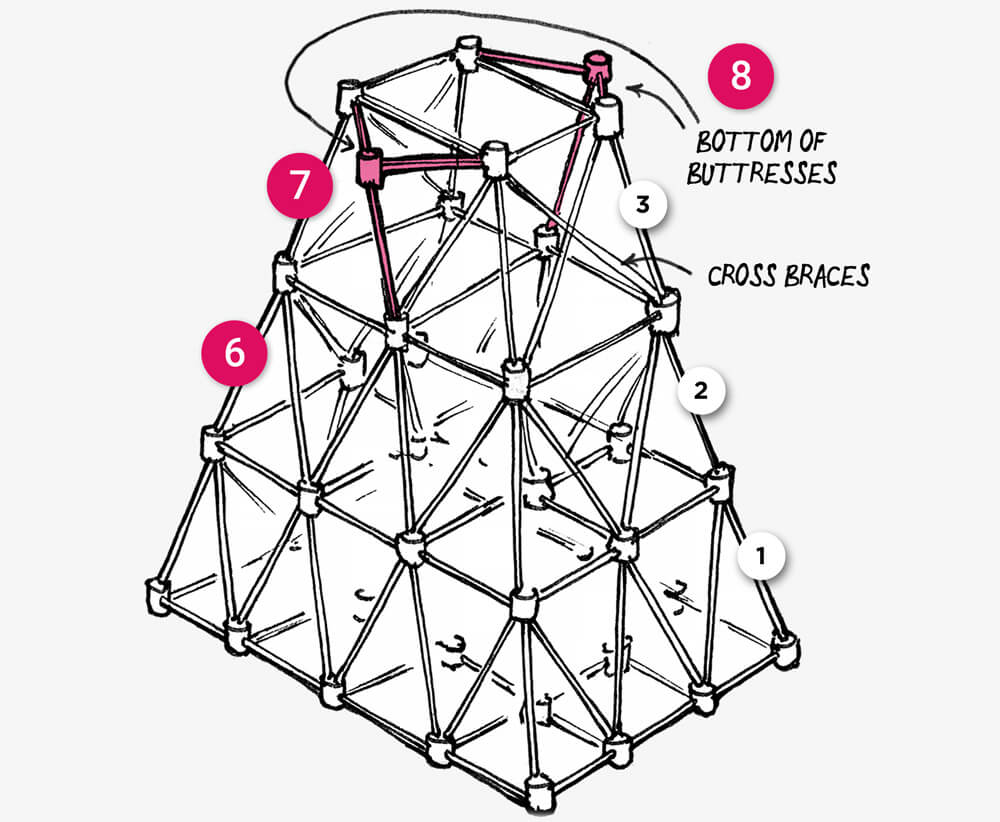
Step 7: Create the Square Transition and Bracing
For layer three, you have to change tack. You need to build a cross-braced square base for the 'spire'. Start by connecting the six marshmallows at the top of layer two to four marshmallows in square formation (each connected via three spaghetti strands). Add diagonal cross braces to provide extra rigidity, follow the illustration closely.
Step 8: Install Lower Flying Buttress Supports
Construct two 'flying buttresses' on opposite sides of layer three, each made from a single marshmallow supported by spaghetti strands, this will help support the spire.
Step 9: Build the Triple-Cube Spire Core
Make the spire separately, we'll join it later. Construct three cubes with the base cube the same size as the four marshmallows in layer three. Add DIAGONAL cross braces to each side, and across OPPOSITE sides, otherwise the cubes will collapse. Make the top of the layer five cube slightly smaller, to provide rigidty.
Step 10: Attach Mirror-Image Flying Buttresses
Add two more flying buttresses, the mirror opposite to the ones you added to layer three.
Step 11: Add the Tapered Spire Point
To complete the spire add a baseless pyramid onto the top cube, to give the spire a nice point!
Step 12: Align the Spire with the Base
Building the spire separately means you can transport it easily in a car. When you are ready to join them, lower the spire onto the top of layer three, aligning the 'flying buttresses'.
Step 13: Interlock the Flying Buttress Joints
To securely connect the spire, push short strands of spaghetti through the two touching marshmallows in each 'flying buttress'.
Pro-Tip
Don’t try burning or cooking the marshmallows in order to ‘strengthen’ them, it doesn’t work... and smells bad!
Step 14: Adding a Load
A popular requirement for school science challenges is for the tower to support an egg. To do that simply push short strands of spaghetti into the marshmallow at the top of the spire, making a 'nest', on which you can balance an egg.
Last Word of Advice
As soon as your tower is four spaghetti lengths tall, the weight of the spaghetti will cause the lower layers to slowly slip (especially in warm conditions).
That’s why if you are going for height, you’re almost certainly going to have to use the ‘pyramid’ technique… trust me!
That’s it, I hope these instructions help, or at least give you some ideas!
Creative Takeaway
Even a spaghetti tower submits to the laws of physics... that's why it's such a great activity for science days, you learn so much, while having so much fun!