How to Make a Space Themed Marble Run for Science DayM
M
In 9 Cool Hand Drawn Steps
suspect science

To view Vimeo video please allow
analytical Cookies
Learn how to make a space themed marble run with a flying comet and rocket launch… from wood!
Yes, no more rickety contsructions and misbehaving marbles, it’s time to invest in wood and take your marble run construction skills to the next level!
Here’s how it works
The intrepid marble starts its journey at the top of the marble run.

It then zig-zags along four dowel tracks before hopping onto a flying comet, which whirls it around, and sends it hurtling down three more tracks. Then, just when you think it’s over, it jumps onto a rocket and is launched back to the top…

…but that’s not the end, the marble has rolled along the back of the stand…

…and after a short trip reappears, only to begin its journey all over again!
Step by Step Guide
Hopefully that’s inspired you to build your own space themed marble run out of wood. If so, the instructions below will help, they don’t cover every step of the build but should help get you on your way.
Let’s get stuck in…

STEPS 1 & 2: Use MDF or plywood to create the stand. Cut a section 600mm x 800mm for the upright and screw on a smaller section to create the base.
To make the tracks, glue flat wood strips onto the front of the stand, one at the beginning of the track, one in the middle, and one at the end. Make sure they are all inline and on a gradient, otherwise the marble won’t roll!
Now, cut two equal lengths of dowel and glue them onto the track supports. One against the face of the stand, and the other slightly less than the diameter of the marble away, this will make the marble roll super slowly.

STEPS 3 & 4: The flying comet is a small tin box at the end of a wire arm. The force of the marble rolling into the box causes it to swing around (3A) and hook onto a tin clip allowing the marble to roll out onto another set of tracks (3B).
Sounds simple, hey? Unfortunately, a rolling marble doesn’t generate much force, so you need to build a counterbalance to increase the sensitivity.
First, make a small tin box using the biscuit tin, cut it with tin snips, adding folds as necessary, and securing with hot glue. When done, attach the box to an L-shaped wire arm using more hot glue (4).
Next, glue a wood spacer onto the front of the stand, this prevents the tin box rubbing on the surface and helps support the axle part of the wire. Drill a hole through the centre of the spacer (big enough to allow the wire to rotate freely) and push the wire arm through.
With the tin box in an upward position (12 o’clock), use hot glue to attach a horizontal wooden arm onto the wire on the reverse side of the stand. Next, glue coins onto the arm until the weight of the marble rolling into the tin box is just enough to tip the arm over.
Now, make a clip from a rectangular strip of tin folded in half. Glue it onto the front of the stand, using another wood spacer to position it accurately - it needs to stop the box falling backwards after it goes past.
Finally, you’ll also need to glue a wooden stop behind the clip to prevent the box swinging too far backwards.

Step 5: The rocket is another tin box. The magic is in the release catch, a strip of tin with a lip (A) that hooks onto a corresponding lip on the base of the box (B).
When the marble tumbles into the lift it knocks the catch backwards, releasing the lift, which flies upwards under the power of the counterweight.
I won’t explain how to build the ‘lift’, the illustration above is pretty clear, hopefully youy can follow it for yourself.

STEPS 6 & 7: To complete the rocket launch, you need to add wood guides, and attach a counterweight (a tin full of coins) by running cotton thread over wire guides, one end joined to the weight, the other to the top of the ‘lift’.
As you can see above, there are holes in the wooden guides to allow the marble to roll in, and roll out, and to be able to access the ‘handle’. So allow for these.

Step 8: As mentioned previously, ensure there is a hole in the wood guide to allow the marble to roll out. Fashion a right-angle gulley (from tin) to guide the marble from the top of the launch, though a hole in the stand, and onto the reverse side… where it continues on more wooden tracks.
You’ll of course need to make another hole in the stand to bring the ball back to the fronts, where it can repeat its journey.
Well, that’s it - those are the most important elements of the marble run, I hope it gives you some great ideas.
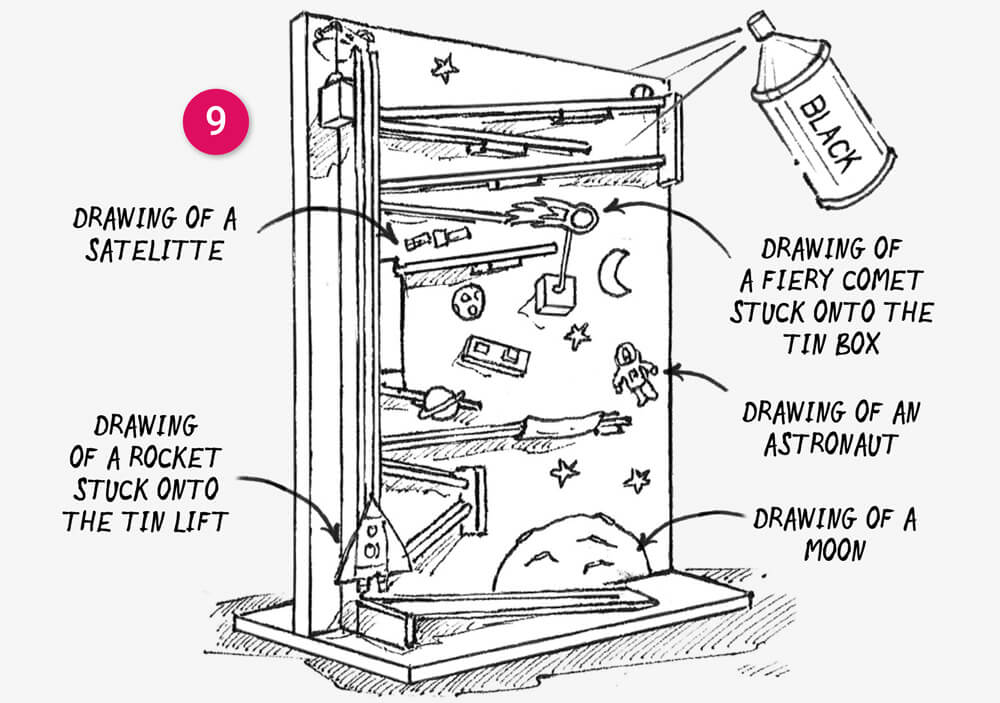
Oh, one last thing… and don’t forget to decorate your marble run.

Step 9: Spray it (or paint it) and accessorize the rocket launch and flying comet by sticking on colourful drawings.
Materials List
- A sheet of MDF or plywood
- 6mm dowel
- Square and flat wood strips
- Old bisuit/sweet tin
- 1.5mm wire
- Cotton thread
- Hot glue and gun
- Drill and assorted drill bits
- Screwdriver and assorted screws
- Pliers and tin snips
- Pencil, ruler or tape measure
- Paper, spray paint and colouring pens
Creative Takeaway
Marble runs challenge you in so many diffrent ways… creatively, technically… and also your patience! They are also a great way to bond with your kids, while at the same time teaching them some practical skills.